This helps you see all the objects on the slide. 19/01/2017 · by using this tip, you can make sure your text and images are all evenly aligned.
Check And Change Reading Order In Powerpoint Center For Academic Innovation via facultyhub.chemeketa.edu
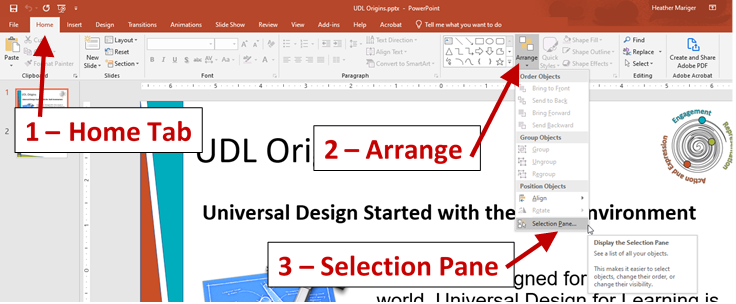
From the menu that appears, choose grid and guides. Select view > guides to show the horizontal and vertical center lines. This helps you see all the objects on the slide. In powerpoint, place your mouse somewhere off of the main slide that you’re working on, but not so far that you’re in a sidebar somewhere. 05/06/2013 · the grid feature provides another way to align your powerpoint images. 15/07/2019 · the simple way to layer your images is to click on each image that you want to arrange and then select one of the options from the ‘arrange’ section. Align left, align center, or align right. Keep the selection pane open. Select view > gridlines to show more gridlines. Distribute horizontally or distribute vertically. 08/01/2022 · add pictures, icons, illustrations, logos, svg files, stickers, people callouts or cartoons. If you choose bring to front, the object will be placed top of the others. Select picture format > align and select how you want to align them: Step 2 − click on the selection pane to open the selection and visibility sidebar. When the grid appears, you will have a better idea of image alignment and spacing by using the gridlines as your guide. Step 3 − select one of the rows in the sidebar to highlight the corresponding content in the slide. Align top, align middle, or align bottom. Click on any image, go to the format tab and select view gridlines. 19/01/2017 · by using this tip, you can make sure your text and images are all evenly aligned. Step 1 − select one of the contents and go the arrange group under the format ribbon. If you choose send to back, the selected object will be behind all the other elements.
If you choose bring to front, the object will be placed top of the others.
Select view > guides to show the horizontal and vertical center lines. When the grid appears, you will have a better idea of image alignment and spacing by using the gridlines as your guide. 15/07/2019 · the simple way to layer your images is to click on each image that you want to arrange and then select one of the options from the ‘arrange’ section. From the menu that appears, choose grid and guides. 05/06/2013 · the grid feature provides another way to align your powerpoint images. Align top, align middle, or align bottom. Step 1 − select one of the contents and go the arrange group under the format ribbon. 19/01/2017 · by using this tip, you can make sure your text and images are all evenly aligned. Click on any image, go to the format tab and select view gridlines. Keep the selection pane open. Step 2 − click on the selection pane to open the selection and visibility sidebar. Align left, align center, or align right. Select picture format > align and select how you want to align them: This helps you see all the objects on the slide. If you choose send to back, the selected object will be behind all the other elements. If you choose bring to front, the object will be placed top of the others. Select view > guides to show the horizontal and vertical center lines. Select view > gridlines to show more gridlines. Distribute horizontally or distribute vertically. In powerpoint, place your mouse somewhere off of the main slide that you’re working on, but not so far that you’re in a sidebar somewhere. 08/01/2022 · add pictures, icons, illustrations, logos, svg files, stickers, people callouts or cartoons. Step 3 − select one of the rows in the sidebar to highlight the corresponding content in the slide.